Adding some floating plants to your aquarium might create an aesthetic look. However, it may get overcrowded or cover the upper surface of the aquarium.
No matter how hard you try to put your plant in one place, it won’t remain there. Not even for a minute.
So you might be stressed over how to keep floating plants in one place?
You can attach the fishline with suction cups and set it to both sides of the aquarium. Or you can make a circle trap by using an air hose. Just cut them in your preferred size and attach them with a holder. Or make a square straw holder and attach it to the aquarium.
This is just a trailer. To know the details about 4 alternative methods for keeping your floating plants in one place, just scroll down.
Why Do We Need To Keep Floating Plants in One Place?
But wait, before moving to the methods, let’s see what threats can be imposed by floating plants.
We get that you have your reasons for wanting to keep your floating plants in one place. But we thought you might not know how serious the consequences can be if you can’t manage floating plants.
So here’s what’s you’ll have to face if you’re unable to do so-
Problem 1: Floating Plants Disrupting Power Filter
Well, the most common thing that could happen is that your floating plants gather around the HOB power filter. Some even clog the airway of the filter, making it difficult to operate.
As you know the air filter allows oxygen bubbles in the tank. So your fish can swim properly. These floating plants roam around the fish tank. And close the airway from where the bubbles get out. Find out if the filters are blocked by any floating plants. You might need to keep them in one place to avoid getting the aquarium or pond filter.
If you’ve been wondering why your HOB power filters don’t work properly, this is the reason. Hence, keeping floating plants away from filters is a necessity if you want the filter to work properly.
Problem 2: Fishes Not Getting Enough Food
If you’ve already noticed a certain deterioration in the health of your fish. Or if you’ve noticed your fishes are not getting much food, this can be due to your floating plants.
Yes, you’ve read it right. If you look closely, you’ll see that the fish food gets carried away with the floating plants. That makes it really hard for the small fishes to eat the food. So, check for fish foods around the floating plants, which will give you a reason to keep the plants together.
As a result, they suffer from malnutrition. Pretty bad for those little creatures, right? Well, if this scares you then just look at the next consequence.
Problem 3: Light Not Reaching the Ground Plants
You might be wondering, do floating plants need light?
Light is the essential element for the growth of any plant whether it’s aquatic or not. Another alarming thing caused by floating plants is that the plants on the ground of the aquarium do not get enough light.
But as floating plants cover the upper surface of the aquarium, the lower plants do not get enough light. So, if you’ve noticed your dwarf hairgrass melting, then this might be the reason.
This is also the reason behind your micro sword carpet not spreading. Even if it is spreading, soon enough inadequate lighting will stop its growth. So, when we compared dwarf hair grass to micro sword, we saw lighting is important for both.
See, we told you how harmful it can be if not maintained properly. But don’t worry, we’ll guide you through alternative ways on how you can keep your beautiful floating plants in place. Just dig in-
How to Keep Floating Plants in One Place? 4 Sure-Fire Methods

Source: https://www.google.com/
Now you know how dangerous it can be to your fishes or ground plants if you don’t keep your floating plants in one place. So it’s time to see how you can keep floating plants just where you want. For these, you can follow either of the 4 DIY methods-
Method 1 of 4: Fishing Line Plant Border
If you’re looking for the simplest and most commonly used method, then this is the one for you. But first, you’ll need to get the following things-


Now that you’ve gotten your hands on the tools, let’s get to it.
First, you’ll need to decide whether you want to mark the area for your floating plants horizontally or vertically. After deciding that, take out your fishline. And cut it upon the measurement of how much space you want to allocate for the plants. You can use C.JET TOOL 10″ Heavy Duty Scissor to cut the string in no time.
You’ll see that your suction cup has tiny holes on the top. Just insert the fishline string within it and attach the suction cups to your aquarium wall from the inside.
The suction cups from both ends will hold the fishline. And the fishline will work as a border for your floating plants.
If you’ve been worried about keeping floating plants away from power filters, then this method will help you. Plants such as water sprite, dwarf water lettuce, and hornwort can cause this kind of problem.
A quick tip is to attach the suction cups 1.5 inches below the upper surface. So that no matter what floating plants you have, the fishline will hold them.
Method 2 of 4: Air Hose Plant Trap
Now is the time for another easy DIY method. If you got aquariums and fish then it’s pretty normal that you’re acquainted with the air hose/air tube. Well, this method is pretty much about turning your air hose into a plant trap. This trap could save you from insufficient aquarium light.
We listed our recommended tools for this method below-


Now that you know what you need for the DIY floating plant trap, it’s time for work.
Measure the air tube and mark it at 2 inches with a Sharpie Permanent Marker. Then cut it with heavy-duty scissors. Now attach an air pipe connector bow with both ends of the air hose. You need to make sure that the bow is attached tightly to both ends of the air hose. The trap should be in a circular shape.
Now that you’re done making the floating plant ring. Place it in your aquarium and put all the floating plants inside of it. This trap is perfect for free-floating plants such as the red root floater, duckweed, and frogbit.
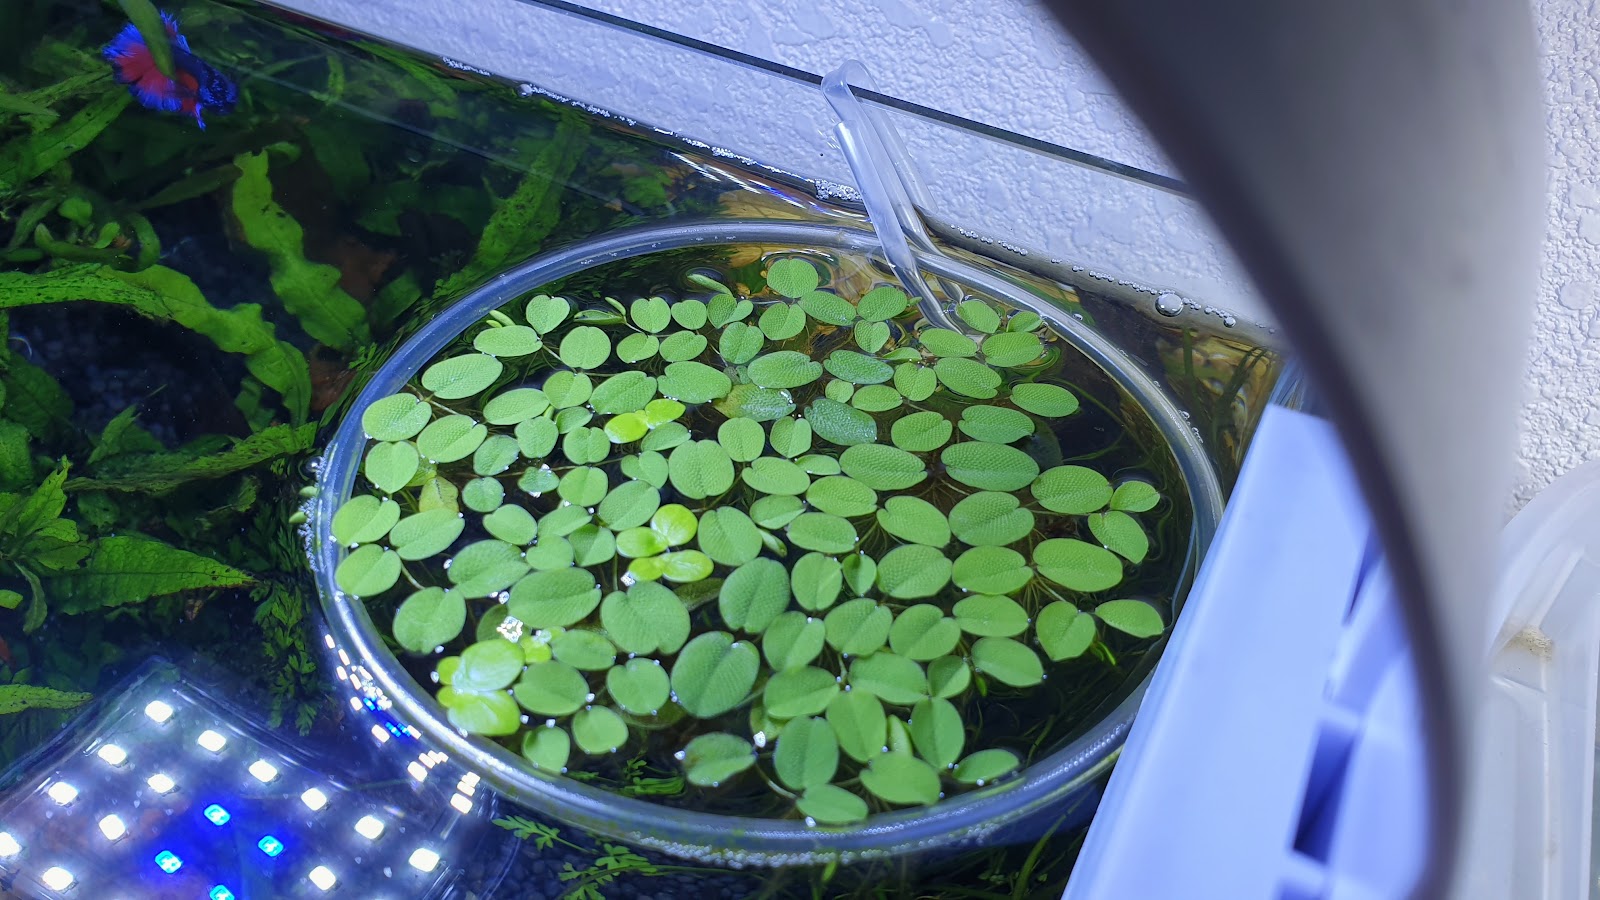
Now all your floating plants are trapped inside the ring. And you won’t have to worry about your fish not getting the food. Because they have most of the aquarium to themselves now.
Are you having trouble understanding the process? No worries! Just watch the following video, everything will be crystal clear.
Method 3 of 4: Bottle Plant Trap
Another method is to make a bottle trap for your plants. If you’re into recycling bottles, we have a helpful yet easy method for that.
Now time to search for the perfect tools. What you’ll need is-


It’s time to make the cute little bottle trap using the tools. Now look for the circles on your bottle. The middle part will give you a perfect mini circle-shaped plant trap.
While cutting out the perfect circle, make sure to cut an extra part above the circle to use it as a handle. While cutting the handle, it should be in the shape of your little finger. Though you don’t need to curve it exactly like the finger. Just a vertical “I shaped” handle should be cut.
Now after you’re finished with the cutting part, take your lighter and try to warm the extra plastic piece you’ve kept as a handle. Warm it lightly and mend it in a reversed “V” type clip shape.
Now it’s time to put your aquarium floating plant ring in the aquarium. Put that reversed V clip on the aquarium wall. So that it sticks with the aquarium glass wall.
Now put the plants inside of the plant trap. This plant trap won’t move a bit without you manually moving it. So you’ll be successful in trapping your roaming plants.
Method 4 of 4: Straw Plant Trap
When it comes to recycling, recyclable straws are no exception. In fact, this method will ensure that your spare straws come in handy. Here, you’ll make the floating plant trap in a square shape using straws. Which can occupy more plants.
To make the trap, the following things will be needed-
| Buy | Image | Title |
|---|---|---|
| Grab it Now |  | Flexible Disposable Plastic Drinking Straws |
| Grab it Now |  | AQUANEAT Aquarium Tubing |
| Grab it Now |  | Amazon Basics Multipurpose Office Scissors |
| Grab it Now |  | Seachem Flourish Glue |
| Grab it Now |  | BIC EZ Reach Lighter |
Now just scroll through the following steps to get your straw plant holder ready.
Step 1 of 3: Cut the Straw and Air Tube
First things first, you’ll need to cut four straws into 2–3-inch pieces as we’re making it in a square shape. The perfect measurement to cut the straws is to bend the plastic straw and see where it matches the other side.
When you bend, you’ll see the squeezed part of the straw stretching. Now press the stretched part against the lower portion of the straw and cut it. Remember to cut both sides together. Now cut all four straws just applying the mentioned method.
Now, you’ll have to cut the air tube into 4 pieces. Each piece needs to be exactly ½ inch in length. And you’re ready to create your trap.
Step 2 of 3: Attach the Straws Together
The fun part starts now. Take one straw piece that you’ve already cut.
Now, you’ve to brush the seachem superglue to the air tube which you’ve already cut. And push the air tube inside the straw. Now attach another straw end with the other side of the air tube. Press the straws in each other’s direction until the air tube is not visible anymore.
This means the air tube pieces will be inside the straws from both openings. It helps in attaching with the other straw pieces.
Now follow the same process to attach the other straws. Finally, you’ll see a square made of straws.
Step 3 of 3: Make the Straw Plant Holder
By now, you’re done with the straw trap making process. It’s time to add the holder to it. For that, you’ll need two straws and one ½ inch air tube.
Again, you’ve to cut the straws. But this time, stretch the squeezed straw part to the fullest. Try mending the straws by using fire from the lighter.
Now hold the straw with the mended part together, now it should be like a closed clip. Now, cut the straws into 2-inch pieces. And just like before attach the air tube with both straws from both ends. And don’t forget to apply the super glue to stick them together.
The holder will end up looking like an “S”. Then put the holder on the aquarium wall. And set the square-shaped trap on one end of the holder. The holder will ensure that the trap doesn’t go anywhere.
Time to put your floating plants inside the trap. And your floating plant guard will do the rest. Since it can hold more plants, you can trap floating plants with long roots as well. Such as the Brazillian Pennywort.
Also, you can use this kind of loop if you made pond in a terrarium.
Comparison Of The Four Plant Trap Methods
Now that you know all the methods for keeping the aquatic floating plants together, let’s take a comparing look at them-
| Method | Fishing line plant border | Air hose plant trap | Bottle plant trap | Straw plant trap |
|---|---|---|---|---|
| Tools | Fishline, suction cups | Air tube/air hose | Plastic bottle, mini scissors, lighter | Straws, Standard aquarium airline tubing, Scissors, Aquarium safe super glue, Lighter |
| Required time for setup | 30 mins | 10 mins | 40 mins | 40 mins |
| Difficulty | Easy | Easy | Hard | Medium |
| Optimal plant type | Free-floating, submersed floating leaves, creeping, trailing floating | Free floating | Submersed floating leaves, creeping, trailing floating | Submersed floating leaves, creeping, trailing floating |
FAQ’s
How do you make plants float while ensuring the fishes feed properly?
In this case, you can do the reverse. Instead of trapping the floating plants in traps, let the plants float all over. But to ensure your fishes are getting the food, make a food trap. Just make the air hose tube circle and use it as a feeder hole. So, when you put food through the hole, fishes can have the food without any distraction.
Does attaching the fishline with the suction cup work?
Yes, this trick certainly works for everyone. But you might need to change the suction cups once every month.
Is there any other way to make a trap?
Yes, you can also make a loop from an acrylic glass tube. In this case, you have to warm up the tube and bend it into a round shape. To cut the tube, you’ll need a Dremel. It is highly professional work so we suggest you be careful while doing it.
Endnote
This is all from us about keeping floating plants where you want them to. Big applause for having the patience to learn all the details on how to keep floating plants in one place.
Do let us know in the comments which method worked for you.
Thank you & good luck.