Choosing between biocubes of the same size can make one scratch his head hard. That’s because they almost offer the same features. So, it’s quite hard to differentiate between them.
For that, people tend to go with random biocubes since they all seem the same to them. However, there are parameters that can differentiate them well enough!
So the query arises when it comes to coralife biocube vs oceanic biocube.
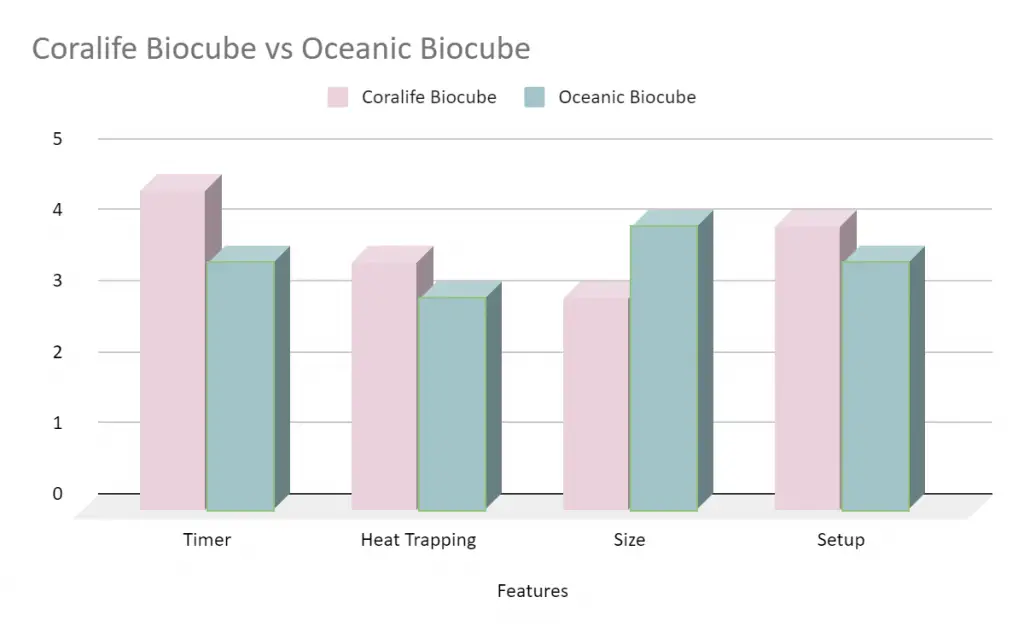
Oceanic biocube offers more available sizes in gallons than coralife biocube. But, Coralife offers a more versatile timing system than the oceanic biocube. It’s also much easier to upgrade. But, it has a poor heat-maintaining pump.
Well, these were just an overview of their differences. We’ve outlined a detailed in-depth comparison among these two biocubes for you.
So what are you waiting for? Let’s dig right in!
Quick Difference
Let’s have a look at the quick difference between coralife and oceanic biocubes before jumping into the thorough details –
| Parameters | Coralife Biocube | Oceanic Biocube |
| Type | Compact | Compact |
| Weight | 62 lbs (32 Gallons) | 54 lbs (29 Gallons) |
| Available sizes | 16, 32 (Gallons) | 8, 14, 29, (Gallons) |
| Lighting | Moonlight LED, Wight LED, Full Spectrum | 3 Lunar Blue LED Lights, 2 fluorescent lamps(36 watts) |
| Water type | Fresh water and saltwater | Fresh water and saltwater |
| Dimension (32 and 29 Gallon) | L-20.25”W-21.875”H-21.5” | L-22.4”W-20.8”H-24.2” |
| Noise | Quiet | Quiet |
| Customizable filtration | Yes but not extremely needed | Yes and advised to upgrade |
| Timer | Versatile timer like-30 minute sunrise/sunset60 minute moonrise/moonset24 hr | Yes but not versatile |
| Setup difficulty | Easy | Easy |
| Hinge top | Programmable hinge top hood | No hinged top |
| Hood trapping heat | Good | Average |
These were arranged so that you can follow this as a checklist in case of choosing between the two. However, you can also take a look at the following graph to get another view.
This was just the tip of the iceberg. They all have a number of factors to be addressed to be able to choose between them.
Coralife Biocube vs Oceanic Biocube – A Detailed Comparison

Source: https://www.nano-reef.com/
So, we’ve seen the quick comparison chart between these 2 biocubes. It’s time we had a more detailed overview of the features. So let’s take a look-
Design and Construction
The design of both of these biocubes is amazing. They come in similar construction with concealed instruments on the back.
Let’s have a wider look of this-
The coralife biocube is pretty slick to look at. It has a black body covering, with a transparent tank. The tank looks very lively due to its curved edges. These curved edges don’t change the viewing angle either. The oceanic biocube is also very much similar in design to the coralife biocube.
Oceanic also has curved edges which make the inhabitants inside look more vibrant and lively. The filtration and other components are nicely hidden and it doesn’t catch the eye.
Both of the tanks are compact in size so that’s perfect to put in one corner of the house. Plus, it’s not like those large-sized aquariums that take up half the space of your room.
Moreover, all mechanical portions including the filter are covered out in the back. In this way, you can’t see those. This is another good thing about the design of these two aquariums.
On one hand, the built-in LED lights of coralife biocube add an aesthetic view to the tank. On the other hand, oceanic has comprehensive lighting systems that are packed into the hood. There’s not only the lighting system there but also the dual cooling fan.
However, do you know, there’s also a stand made particularly for coralife biocube tank? This goes perfectly with the design of the tank.
You can buy the stand for this tank separately from here-

Prices pulled from the Amazon Product Advertising API on:
Product prices and availability are accurate as of the date/time indicated and are subject to change. Any price and availability information displayed on [relevant Amazon Site(s), as applicable] at the time of purchase will apply to the purchase of this product.
Winner: So in the case of designing, both of them have a pretty similar design construction. So both are the winners here.
Available Sizes
A tank with versatile sizes widens the options for the users. Luckily it’s no different for these biocubes either. They offer many sizes. Let’s see-
The coralife biocube comes in 2 different sizes. These are 16 and 32 gallons. You can choose among these two whichever you need. With the 32 Gallons size, you can hold double the marine life compared to 16.


But it will take up a little bit more space in your room. But don’t worry, it’s still compact in size and doesn’t take a lot of space in general.
On the other hand, the oceanic biocube comes in much smaller sizes. It comes in 8,14, 29, and 32 gallons too. If you want an absolutely small tank with limitations of marine inhabitants, you can go with 8 or 14 gallons. Mostly these are friendly for the new aquarists out there. So grab one if you are!
Winner: Tie
Setup and Filtration

Source: https://www.nano-reef.com/
The setup methods of these biocubes are simple. However, coralife biocube is much easier to set up than oceanic biocube. If you choose an oceanic biocube, you have to take more hassle than setting up the coralife. Let’s see-
The difference in setup method for oceanic biocube from coralife is in the filtration process. This is the main distinguishing factor here.
However, the coralife biocube that you will buy will have a tank and a carbon filter to it. All other things that complement the setup need to be bought separately.
Coralife Setup
Here’s our recommendation of the components for the complete setup of Coralife Biocube-
- Carib Sea Live Sand for Aquarium– preserves its own original, natural bacteria
- CARIBSEA Natural Corral– creates the perfect environment for natural nitrifying bacteria
- TL Reefs Premium Biopalletes– naturally reduces phosphate and nitrate levels in your aquarium
- Chemi Pure Blue Filtration Media– keeps pH stable
- Seachem Matrix Biological Medi- Supports denitrifying bacteria
- Aqua Clear Foam– provides biological filtration as friendly bacteria grow
Now let’s see how you can set up the biocube successfully-
Step 1: Complete the Filtration Process
The back of the tank has a media basket chamber that has 3 empty channels from top to bottom. You can put your desired biological and chemical filtration components to it. Your biocube already comes with a carbon filter that will act as the mechanical media.
In the first chamber, insert all of the Chemi pure. It should already come in a small mesh bag. What it does is, clear out the water from any kind of floating particles. It also reduces the excess phosphate levels there.
In the second chamber, put the bio pellets in a mesh bag. It helps maintain the nitrate and phosphate levels of water. This will work as an excellent filtration component to your biocube. It will take 3 weeks to start working.
Finally in the third chamber, put the matrix for the biological filtration. Biological filtration is an essential part of the filtration process in aquariums. This matrix will remove all the excess ammonia, nitrates, and nitrites from the water.
After these steps, you put the chamber in the back of the biocube. Don’t forget to add the carbon filter on top of the first chamber above the chemi pure.
Step 2: Insert the Foam or Protein Skimmer
Now, you need to insert the aqua foam beside the 3 chambered trays. There is a space there that will fit perfectly for this foam. You can either put the foam there or a protein skimmer. It’s up to you. The foam will gather any pollutants of the water from the tank.
Step 3: Install the Live Sand and Live Rock
Now you need to do the final step and put live sand and rock to the biocube. These work as perfect biological filters and also enhance the view of the tank. You need to add the sand first. You can add it as per your wish. In the 32 gallon tank, it’s wise to put a 120 lbs live sand. After the sand, add a little water to it. And put the live rock over this substrate.
Finally, add water accordingly. Don’t fill the entire tank with water or it will cause a mess. Put some spaces on the top empty for maintenance and care. Plus, you can also install a bubble stone if you want. However, make sure to keep them in one place.
Oceanic Setup
Oceanic biocube doesn’t come with the media basket like coralife. Instead, there’s a live rock filtration system and media balls. So you need to put effort to complete the filtration in the setup process.
For this, we recommend you install the media basket in the middle chamber like the coralife setup. This media basket will give you a much more efficient filtration system.
Here’s our recommended media baskets you can look through-


Step 1: Media Basket Installation
To install the media basket you need to cut a little portion of the tab in the mid chamber. You need to cut the tab according to the size of the basket so that it fits. So we suggest you use a Slice Box Cutter. It’s very durable, and safer to use than traditional utility knives.
Step 2: Protein Skimmer Installation
Now, fill up the media basket with what we recommended for the coralife biocube. If you want to install a protein skimmer, you also need to make a cut on the tab of the first chamber. The 3rd chamber has the pump in it so it won’t be a problem to differentiate.
Step 3: Install the Live Sand and Live Rock
After you have completed the filtration process, it’s time to put in those live sand and live rocks. This is the same as the coralife biocube setup method as we mentioned.
So as you’ve seen, you have versatile options open for filtration if you choose coralife. These are a little limited in the case of oceanic biocube. Plus, you need to put more effort to make your desired filtration system friendly.
If you want a overall visual instruction of setting up a biocube you can watch the following video-
Winner: Coralife
Lighting
Lighting is an important factor for biocubes. That’s because it’s a matter of concern if the stock lights that these come with are enough or not.
But the advantage here with coralife is that it has a much more versatile timing system than oceanic. Also, you can choose between different lights to upgrade both of these stock ones.
So let’s see-
The lighting system of coralife biocube is the most eye-catching feature it has to offer. It has 3 different colors of LED installed in it. These are sparkly blue, white, and full spectrum.
On the other hand, the oceanic biocube has a blue and white bulb along with moonlight. These lights also come with a timer. But, the 30-minute sunrise/sunset timer is absent here like the coralife. So that’s a plus point for coralife.
The timers along with coralife is a unique feature. There’s a 24 hr timer on top of the hood by which you can switch these LED lights throughout the day on its own.
Also, here’s a 30-minute sunrise/sunset timer and a 60-minute moonrise/moonset timer. It makes the inhabitants feel more natural like in the ocean.
However, the stock lights of Oceanic are pretty good too. You can easily set any of them for a particular time. You can also keep all of them open at the same time. These stock lights are enough as low to the high-intensity levels of lighting.
But if you have plants that require high-intensity light, you can upgrade them.
Here’s our recommendation for upgrading the lighting system-
| Buy | Image | Aquarium Light | Benefits |
|---|---|---|---|
| Order Now! |  | AQUANEAT LED Aquarium Light | No limit to rim size |
| Order Now! |  | AQQA Aquarium Light | Adjustable Extendable Bracket |
Winner: Coralife
Water Type
Water type is another important factor for biocubes. Many people want a saltwater reef tank as biocubes. So they get disappointed if the tank is only suitable for saltwater.
But the good thing here’s that both coralife and oceanic biocubes are suitable for saltwater and freshwater. So this is a great flexibility that both of them provide.
Winner: Tie
Pump and Heat Trapping
Source: https://www.reef2reef.com/
In both of the biocubes, the energy provided to the return pumps creates the heating. There’s also a lighting system that can create heat but apart from that, the pump is responsible for heating. Oceanic biocube has surprisingly better heat maintenance in low heat than oceanic. Let’s see-
The stock pump that comes with Coralife is a 265 GPH return pump. It can provide a good amount of water flow for the livestock. But when it comes to heat, it has trouble keeping a low heat level in comparison to Oceanic. In that case, you can upgrade the pump so that it doesn’t make everything hotter.
Here’s our recommendation for pump replacements of coralife biocube-

Prices pulled from the Amazon Product Advertising API on:
Product prices and availability are accurate as of the date/time indicated and are subject to change. Any price and availability information displayed on [relevant Amazon Site(s), as applicable] at the time of purchase will apply to the purchase of this product.
In the case of the oceanic bio cube, the pump is a 250 GPH return pump. It doesn’t have heat-trapping issues like coralife biocube. It can, in fact, maintain lower heat levels than the coralife biocube.
Winner: Coralife
Upgradability
Both of the biocubes have options for upgradability. However, one is a little easier to upgrade than the other. In this case, coralife biocube is the winner. You don’t need to put as much effort as an oceanic biocube in order to upgrade the coralife. Let’s see-
As we mentioned, the coralife biocube is a bit easier to upgrade than the oceanic biocube. By upgradability, we mean upgrading the lighting, filtration, return pump, protein skimmer, etc.
The filtration system, lighting, and protein skimmer is easier to upgrade in the coralife biocube than Oceanic Biocube. There’s already space for adding a protein skimmer in here.
Also, the filtration media tray in the biocube has enough space around it. So you can easily upgrade it. You can also add strips of LED lights just around/below the stock lighting system.
Here’s our recommendation for a complete upgraded setup for coralife biocube-
| Image | Product | Price | How's it Good? |
|---|---|---|---|
 | Bubble Magus Protein Skimmer | Grab it Now | Produces just the right amount and size of air bubbles |
 | hygger Advanced Full Spectrum LED Aquarium Light | Grab it Now | 24/7 Light Cycle, easy Programming |
 | PULACO 400GPH Submersible Water Pump | Grab it Now | Adjustable Flow |
 | Marineland Penguin Bio-Wheel Power Filter | Grab it Now | Provides excellent wet/dry biological filtration |
On the other hand, in the oceanic biocube, it’s a bit harder for upgrades. You just have to break a little more sweat but the job can be done.
You can easily upgrade the lighting system here just like the coralife biocube. But you need to cut some tabs in the back of the biocube to install a protein skimmer or heater. We’ve already mentioned how to do that.
The same goes for upgrading the filtration media tray. You need to cut down a little bit in the back for an upgrade.
Winner: Coralife
So, Which One Should You Prefer?
Both biuocubes come with some great advantages and drawbacks. If you need an instant decision have a look at the summary table below:
| Biocube | Advantages |
| Coralife Biocube | Lighting, upgradibilty, pump and heat trapping, easy setup |
| Oceanic Biocube | Availabe sizes |
FAQs
How many fish can you put in a BioCube 32?
The number of fish you should keep in a BioCube 32 is 4-6. You should not go more than 6 otherwise your fish might be agitated.
Can you use a BioCube for freshwater?
Yes. You can use Biocube for freshwater. In fact, it can be used for both freshwater and saltwater livestock. This is one of the advantages of using a biocube.
Conclusion
This was all from us regarding Coralife Biocube vs Oceanic Biocube. We hope we’ve been helpful in choosing the right one for you. If you still have any queries, let us know in the comment section below.
Thank you for staying with us till the end!