Introduction
A canister filter is a great piece of equipment for your aquarium. However, if not primed the right way, it can disrupt smooth operations in your tank.
So today, we took on the mission to answer how to prime a canister filter.
Priming a canister filter takes 6 easy steps. You plug it out and lower the water below the input. After that, you drain and create a siphon at the output. Lastly, you turn the filter on after draining the output.
Now if you want to know more, spare a few minutes and keep reading. We’ve covered all the steps and all related concerns with priming a canister filter.
What are you waiting for? Let’s jump right in!
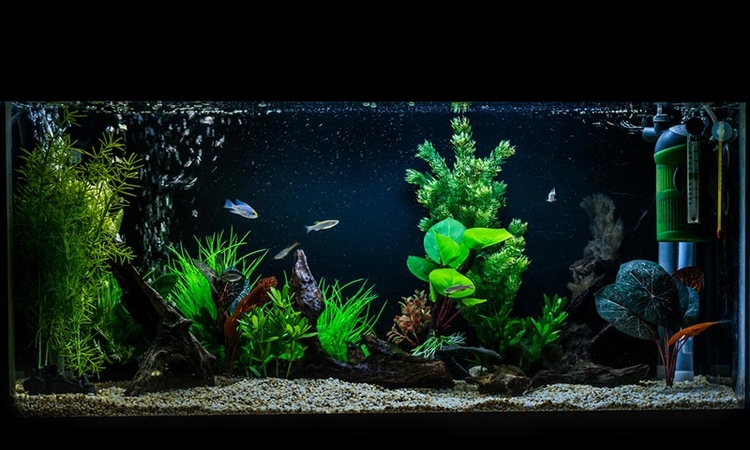
Can You Prime Canister Filter?
Source: https://thepets.net/
Yes, you can prime your canister filter. And this applies to any and all types of tanks. The task of priming a canister filter is to remove air from it. Since you’re dealing with a water pump, the priming will pump water into your tank.
I’ve set up a 20-gallon Tetra Aquarium a few days ago. Although I got a brand new Tetra Whisper Filter I instantly primed it. Because, by priming, you’re making sure the entire setup is oriented for whatever tank you’ve set up.
However, if you’ve picked a canister filter over other filters, great job. This is a fantastic option for keeping your tank in tiptop shape.
Let’s continue to know more about the benefits of priming.
Why Should You Prime A Canister?
Well, there are actually not one but two benefits of priming a canister filter. They include the complete removal of air bubbles and smooth filter operation.
This reduces risks regarding clogs and blockages. Consequently, this keeps your filter operating smoothly. So, less trouble regarding maintenance and cleaning.
I know we aquarists are always enthusiastic about detailed information. So, let’s go through a few lines more to know how important priming a canister filter is.
Air Bubbles
Air bubbles in a canister filter are not a good sign. Your canister filter will make gurgling noises and it won’t filter right.
Air bubbles cause a plethora of issues and can add troubles with the filter.
Smooth Operation
On top of that, air bubbles cause issues with clogging and blocks. It won’t drag the water through the hoses and block your canister filter.
By priming, you ensure that the filter is working right.
How Often Should You Prime A Canister Filter?
Generally speaking, you should prime your canister filter once every 3 to 4 months. Priming is associated with cleaning the filter. So depending on the type of tank, your canister filter needs cleaning. Which is then followed by priming.
However, sometimes due to incorrect set up the abovementioned issues arise in the tank. So, before priming make sure your filter has been set accurately.
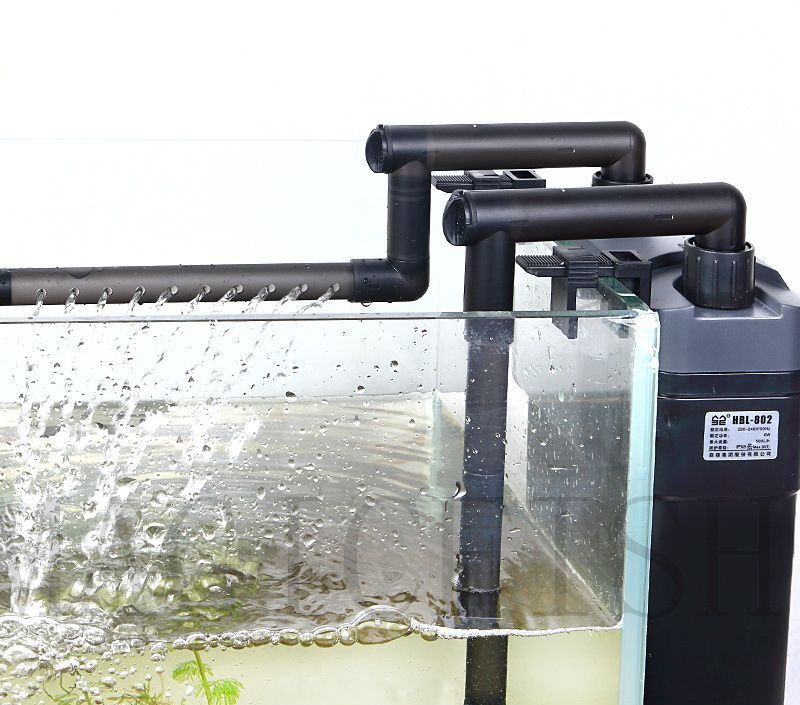
How to Prime A Canister Filter?
Source: https://aquariumadviser.com/
Canister filters can be internal or external. While the external one needs priming, the internal one doesn’t.
Let’s find out more, shall we?
Priming An Internal Canister Filter
As I saw my MarineLand Internal Canister Filter, I noticed it’s much smaller than its external counterpart. It hangs inside the tank and remains submerged in the water. There are no hoses and pipes like there are with an external canister filter.
Now, because the internal canister filter remains in the water, it needs no priming. Water remains inside and outside the filter and thus there isn’t room for air to interfere.
Priming An External Canister Filter
Now, I always prime my Polar Aurora external filter. Because priming is mainly associated with the cleaning of the external filter. Every canister filter has 3 layers of filter media. The chemical media at the bottom, the biological media in the middle, and the mechanical media on top.
Basically, the chemical media is made of activated carbon that removes fine particles from the water. The biological media has algae that help digest and remove waste matter in the water. Lastly, the mechanical media is a coarse layer that removes large particles and debris.
Once these are cleaned, you can then proceed with priming. This is a very easy process and will only take about 5 minutes. All you need to do is follow the simple guide below. The process only requires 6 easy steps-
Step 1: Plug The Filter Off
This is simple enough. Turn the external canister filter off and remove the plug. This is simply to avoid any risks of electrocution.
Step 2: Lower Tank Water Below Input Tube
For this step, lower the water in the tank. You need to do it so that it’s below the level of the input tube.
You can simply use a water transfer pump here. We’re doing this to ensure that gravity works on our side while siphoning later.
And we also organized a list of transfer pumps for you. Because we don’t want you to end up spilling water everywhere or draining your house.
So, let’s take a look at the following recommendations-


Let’s move to the next section now to know how you can drain the output.
Step 3: Drain The Output
Get a bucket and place the output hose inside. Then, release the valve on the output hose and drain it completely.
You should see debris and particulates from your tank as you drain it. If you don’t, chances are you’ve switched the hoses below mistakenly.
To correct this, simply repeat the process from step 2 after picking the outlet hose. You can also fill your canister filter with water to be on the safe side.
Step 4: Create Suction
For this step, attach a manual siphon to the end of the output hose. Here, you gotta make sure it’s nice and secure with no leaks. Because if air enters, your canister filter won’t prime right.
So to save you from this kind of misery we’re bringing a list of manual siphons that you can totally rely on-
- Luigi’s Transfer Siphon Pump– quick siphon and safe for freshwater
- GasTapper Siphon Pump– the multi-purpose jiggler can be used as a weight to sink the hose
Squeeze the siphon a couple of times and wait. In 2 to 3 seconds, you should hear a bubbling sound. This is the sound of water being circulated inside the canister due to gravity.
Then, place the output hose back to its original position.
Step 5: Place A Net On Output
At this point, you need to place a small net on the output hose. This is simply to catch any debris that may have been in the hose.
Some screen nets that would be durable for you are listed below-


Once the water runs for 5 minutes after the filter is turned on, you can remove it.
Step 6 Turn The Filter On
The last step is to simply plug and turn the filter on. As the filter starts, you should hear bubbling for a few seconds.
After that, the water should run smoothly. And with that, you’ve successfully primed your external canister filter.
However, the different brands of canister filters have different features. Some of them have designated priming options while others don’t.
So, let’s look at the top brands of canister filters and see what to keep in mind.

Prices pulled from the Amazon Product Advertising API on:
Product prices and availability are accurate as of the date/time indicated and are subject to change. Any price and availability information displayed on [relevant Amazon Site(s), as applicable] at the time of purchase will apply to the purchase of this product.
| 1. Has a primer button on the top of the lid 2. During priming, remove the plug of the filter 3. Press the button all the way down 4. Let the canister fill up with water 5. Once full, plug the filter in |

Prices pulled from the Amazon Product Advertising API on:
Product prices and availability are accurate as of the date/time indicated and are subject to change. Any price and availability information displayed on [relevant Amazon Site(s), as applicable] at the time of purchase will apply to the purchase of this product.
| 1. Press the button, turn it down all the way and turn the filter off 2. Press the primer button that is on the top 3. Wait for the water to flow 4. If that doesn’t work, use the 6 steps mentioned in the section |

Prices pulled from the Amazon Product Advertising API on:
Product prices and availability are accurate as of the date/time indicated and are subject to change. Any price and availability information displayed on [relevant Amazon Site(s), as applicable] at the time of purchase will apply to the purchase of this product.
| 1. Make sure the input and output hoses are submerged in the water 2. The external connecting tubes should have no water in them. Do this by draining them using the valves and into a bucket. 3. Keep the canister filter empty 4. Close the valve that’s on the lid 5. Press the blue primer button all the way down until there’s water flowing 6. Wait for the bubbling sound to stop 7. Plug the canister filter in |

Prices pulled from the Amazon Product Advertising API on:
Product prices and availability are accurate as of the date/time indicated and are subject to change. Any price and availability information displayed on [relevant Amazon Site(s), as applicable] at the time of purchase will apply to the purchase of this product.
| 1. Drain all water from the canister and make sure it’s empty 2. Ensure that all the taps are open 3. Place inlet tube into the water 4. Use a siphon to create suction on the outlet 5. Once the water comes out of the outlet, close the outlet tap 6. Simply place the outlet tube into the aquarium 7. Lastly, plug in the power |

Prices pulled from the Amazon Product Advertising API on:
Product prices and availability are accurate as of the date/time indicated and are subject to change. Any price and availability information displayed on [relevant Amazon Site(s), as applicable] at the time of purchase will apply to the purchase of this product.
| 1. Plug the filter off 2. Open the filter up and see if the stacks are aligned 3. If not, take them all out and align them 4. Keep the rubber gaskets on 5. Keep the siphon tab downwards 6. Press the primer button to let water flow |

Prices pulled from the Amazon Product Advertising API on:
Product prices and availability are accurate as of the date/time indicated and are subject to change. Any price and availability information displayed on [relevant Amazon Site(s), as applicable] at the time of purchase will apply to the purchase of this product.
| 1. Plug the filter out 2. Open input and output valve 3. Press the primer button 5 to 7 times to get the water flowing 4. Wait till the bubbling sound stops |
That covers all the methods and instructions for the most common canister filters out there. Let’s continue with other concerns.
What to Do If Canister Filter Won’t Prime?
Source: https://aquariumscience.org/
If your canister won’t prime, then don’t worry. You simply need to figure out the problem and then solve it accordingly. So when I see my canister filter won’t prime, I think of the following reasons.
If the canister filter isn’t priming, it’s due to loops, fungus, or trapped air bubbles. These disrupt the flow of water and prevent proper priming. However, by cutting extra loops, cleaning the fungus, and tilting, these issues can be resolved.
These issues can happen in the hoses or inside the canister filter. So, keep reading to understand each of these issues one at a time.
Here are some common issues aquarium enthusiasts face during priming-
Too Many Loops In Hoses
Your external canister filter is connected to your aquarium by the hoses. These hoses usually have to travel a long way from the tank to the canister. That’s because you keep the filter below the aquarium in a designated place like a cabinet.
You need to make sure that the input and output hoses are kept short and straight. That’s why I prefer Penn-Plax CCF201 Cascade Black Hose. This lets water flow smoothly and prevents chances of air bubbles.
Otherwise, if your hoses have too many loops and bends, the water won’t flow smoothly. They can trap air bubbles which then will then cause issues with priming.
You can identify this issue while noticing the water flow during priming. Your water should stagger and won’t flow smoothly. You can also hear an odd gurgling sound. These are signs that something’s wrong.
Solution
The solution for this is very simple. You need to reposition your tank and cut down the excess piping. Make sure the distance between the tank and the canister is no more than 1.5 meters.
Now, you want to be careful while cutting pipes. If you want to be safe you can use a PVC ratchet cutter. Some of the recommended cutters are given below-
| Price | Image | Product |
|---|---|---|
| Pick it Now |  | Zantle Ratchet-type Tube and Pipe Cutter |
| Pick it Now |  | DEWILL Ratchet-type Pipe and PVC Cutter |
You can choose any of the cutters to do the job.
Once you cut the excess piping, make sure to secure the hoses vertically to the tank. This way gravity will work in your favor during draining and priming.
Also, get Votmell Teflon Tape for this job because it’s waterproof. And make sure you don’t make any holes while cutting.
The Fuss With Fungus And Algae
While algae growing on rocks looks great inside the tank, it’s trouble inside the filter. Due to debris in the water, fungal spores and algae can deposit in the hoses or the canister. As the fungus grows, it can clog the hoses and disrupt the balance of the filter media.
What this means, is that even with the filter on, your water will look dirty. Additionally, your water flow in the hoses will again be disrupted. This way, during priming, you won’t get that smooth flow of water that is problematic.
Solution
The solution for this is pretty simple. Detach the hoses and give them a thorough clean with pipe cleaners. I always use the Desin Nylon Pipe Tube Cleaner. This brush set helps me to get rid of any spores, algae, and deposits inside the pipes.
After that, you need to clean the filters. Open up your canister filters and give them a soak in water. See if you can notice spores or fungal growth in the biological media. If you do, it’s wise if you change it.
You can change your biological media with any of the following recommended filter media-


Lastly, if you’re still concerned, then change the water in your tank and grab the long-saved spinosad. With all the components cleaned and addressed, your canister filter should prime in no time.
Trapped Air Bubble In Outlet
You can tell that any form of trapped air is troublesome. It can also happen due to trapped air in the outlet hose and pipe.
Why the outlet?
Simply because the water in the outlet pipe has to work against gravity. This results in the occurrences of trapped air bubbles being high.
As mentioned before, you’ll hear a gurgling sound. This sound happens because there’s air in the system as opposed to water. This later causes problems with priming.
Solution:
This is a very simple step. Tilt the filter diagonally to make an angle that’s approximately 45°. After that start the priming process. The angle should help water to flow and push the air bubble out.
Be cautious and don’t shake the canister. Shaking can lead to more air bubbles forming and misaligning the filters inside. This will cause additional trouble with priming and can ruin the filter.
To make it easy for you, we’ve summarised it all in the table below.
| Problem | Sign of identification | Solution |
|---|---|---|
| Too many loops in hoses | 1. Water doesn’t flow through pipes smoothly while priming 2. Gurgling sounds are heard | Cut the excess piping |
| Fungus | 1. Water remains dirty despite the filter running properly | Clean the hoses and change the filter media |
| Trapped air bubbles | 1. Water doesn’t flow smoothly 2. Gurgling sounds heard | Tilt the filter diagonally by 45° and straighten out loops in pipes |
Well, now that’s done, let’s proceed.
How To Start A Canister Filter Without Priming?
![10 Best Aquarium Canister Filters for Fish Health [2022 Reviews] | It's A Fish Thing](https://www.itsafishthing.com/wp-content/uploads/2019/06/canister-filter.jpg)
Source: https://www.itsafishthing.com/
Well if you want to start a canister filter without priming, that’s possible too. Many canister filters come with an auto-priming button that you can use. This function will prime it for you without the hassle.
However, if yours doesn’t or you don’t want to use it, there’s a way out too.
There are 4 simple steps to get your canister filter running with no priming. Let’s see them one by one.
Step 1: Fill The Inlet Tube
Firstly, plug the filter out. After that, completely fill the inlet tube. Make sure the valves are completely shut. Leaks will let air enter the tube.
If you want, you can tilt the canister diagonally. This way the filling up tube will push the air bubbles out.
Step 2: Place Thumb Over The Pipe
Once the inlet tube is full, place a thumb on the opening. This is essentially the siphon portion in priming.
By placing your thumb, you maintain the pressure of water inside the tube. This simple hack resolves the need to buy a siphon if you don’t have one.
Step 3: Place Inlet Tube Inside The Tank
While keeping the thumb on the inlet pipe, lower it inside the tank. Make sure no water leaks out in this stage as that can cause air to get trapped.
Once the inlet pipe is submerged in the water, release your thumb. This will help the water pressure equalize on both sides.
Step 4: Open The Valves And Plug The Filter In
The last step here is to simply open the valves and plug the filter in. When you open the valves on the inlet and outlet, gravity and pressure will force water to move.
This water will move through the outlet and then equalize the water pressure. As the water pushes out, it primes itself.
However, if you want, you can invest in a self-priming canister like Eheim 6666 Pro 4+ Canister Filter. These are simple to use and will get the job done. With all that said, we’ve covered all there is about priming a canister filter. We’re very close to the finish line.
FAQs
How do I know if my canister filter is working?
Look at the outlet and see if water is coming out. Many canister filters also create a soft ripple that’s visible. If these signs are present, your canister filter is working.
What should I put in my canister filter?
Go for activated carbon at the bottom. This is the chemical media. On top of that, place biological media of your choice. Lastly, place the mechanical media on top. This can be wool, filter floss, or a filter pad.
How long does it take for a canister filter to cycle?
A canister filter will take anywhere from 2 to 6 weeks to cycle. If you have a small tank that’s less than 30 gallons, it will take 2 weeks. If your tank is larger than that and has more activity, it will take longer.
Conclusion
Well, there you have it! Now you know how to prime a canister filter. With 6 easy steps and a little bit of physics, your canister filter should be primed and running smooth.
We wish you good luck with the priming process. If our advice and tips helped you out, leave us a comment below. We’d love to hear your thoughts!