If you are a grower, you must be a fan of HPS.
But the buzz of the HPS can be quite disturbing. When you use an HPS you expect high productivity.
However, the sound doesn’t go with it. This is an indicator of some electrical problem.
So you may wonder, how to make HPS not as loud?
HPS can be made quiet in four easy ways. You can do it by tightening any loose screw, ballast coil lamination, or by covering the ballast with an insulation box. In the end, you can install dampers on the wall to finally eliminate the sound.
Are you wondering how to do it all together? Don’t worry we have your back. We’ve explained all the steps along with some suggested alternatives.
So, without making any more delay, let’s see what we have in store.
Is it a Subtle BFixuzzing?
The spectrum of the sound that you hear is of high order harmonics which forms about 60Hz of buzzing or humming sound.
For this reason, the spectrum is highly audible.
So, why is your HPS humming?
This is due to the ballast core being oversaturated. As a result, rectification occurs when both electrodes in the ballast warm-up after ignition. The lamp stops rectifying and the DC leads to creating a humming sound.
This also causes the magnetic flux to push outward. When there is steel nearby, a force is created causing the noise.
In this case, you can install a Lutron MAELV-600-WH Lighting dimmer switch that helps or eliminate the subtle buzzing. You can watch the following video to understand the whole installing process easily. Take a look and instantly solve your problem.
Troubleshooting the Problem
Source: https://indoorgardenook.com/
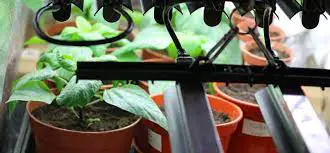
As we know, HPS lamps are very helpful in greenhouse plant production. But they require maintenance for higher efficiency.
LED bulb or HPS is used in growing. After inspection, most growers see that some lamps are having a light humming sound with reduced brightness.
With time these lamps reduce growth and increase sound pollution and electric consumption.
Here, we have compiled the most common reasons for the HPS loud noise that you are facing. Along with that, we have also added a little technical skill to look into the issue and repair it easily.
Without waiting any further, let’s dive in –
Reason 1 of 4: Loose Screw/Capacitor
The most common reason that your HPS is buzzing loudly is for loose screws. This isn’t necessarily the fault of your bulb, a light tightening of the screw will fix it.
Now, you have to inspect the bulb. Was the bulb flickering along with the buzz? If yes, you will see that the bulb burned out too quickly. This is because the bulb was screwed loosely. For this reason, you can hear a buzz.
Fix: Tighten the Loose Screw
Before starting the procedure, you must wear heavy-duty electricity-proof gloves. This will protect your hands from sharp pieces of glass if the bulb breaks. Here are some of the safest recommendations for your security. Take a look-
| Price | Image | Products | Advantages |
|---|---|---|---|
| Grab it Today! |  | Vgo Heavy-Duty Synthetic Leather Work Gloves Mechanic Gloves Rigger Gloves | Versatile usage, touchscreen compatible |
| Grab it Today! |  | Safety Cut Proof Stab Resistant Glove | Level 5 cut resistance standard |
Although you’re wearing gloves try to be very careful while doing powerful electrical chores.
Now, let’s jump into the procedure.
Things You Will Need
- Little Giant Ladders-with max extension height: 11′
- Needle Nose Pliers-with anti-slip rubber for better grip
Step 1: Turning off Power Supply
Turn off the power source by turning off the switch. If the fixture is plugged into the wall, you need to unplug it. Make sure you are using a ladder if the bulb is out of your reach.
Step 2: Opening the Bulb
Hold the bulb keeping your hand close to the base. Then gently twist the bulb anticlockwise.
You will see the bulb coming off the socket. If you see that the bulb is rigid, take needle nose pliers and grasp the base of the bulb.
Then in between the base of the socket and shell side, push the pliers’ end. This will help you pull out the shell off the socket base.
Step 3: Tightening Loose Screw
Look for a small set screw in the bottom of the socket base. You will see that the socket base screws a small diameter pipe onto its top. It must be ensured to set the screw loose.
After that, hold the base steadily. To tighten the socket base, turn the base of the socket clockwise.
If you see that the threaded pipe is also turning along with the base, you have to look at the base. Under the base, you will find a nut covered with a felt.
To stop the nut from turning, hold it with a normal plier. This is to be done while tightening the screw.
Step 4: Reinstalling the Bulb
After tightening the socket base, retighten the setscrew and the nut that you were holding.
Gently screw the bulb back into the socket with a clockwise motion. Stop turning when you feel resistance.
Again, if you feel a lot of resistance before completely screwing the bulb, you need to double-check the bulb size.
Reason 2 of 4: Faulty Ballast Coil Lamination
If you have heard your HPS ballast making a rattling sound, you are listening to your faulty ballast.
When the ballast is loosely clamped to the base, it creates a rattling sound. It happens due to faulty coil lamination. So, the lamination needs to be clamped to stop the intense rattle.
Fix: Clamping the Lamination
As a solution, the coil lamination needs to be clamped. This can be done by using foam insulation in between the ballast and base. Varnish is also used to fix the position. To know further, let’s move to the step-by-step process.
Things You Will Need:
- Klein Tools 32500 11-in-1 Screwdriver-if you want interchangeable blade for fast and easy switch out
- Rust-Oleum 207008 Marine Spar Varnish-UV resistant
- Soft Foam-Reusable polyurethane foam
- Yvan Telescoping Ladder-comes with intelligent locking mechanism
Step 1: Opening the Lampshade
Open the lampshade using the process mentioned in the previous step. You will see clips around the lampshade. You need to rotate the clips using a screwdriver to remove the lamp cover. Keep the clip separately to use them for reinstallation.
Step 2: Disassembling the Wire Plugin
After the lamp cover is removed, you will see a slot for wire on the ring lamp. The wire extension in the holder is inserted in the slot. It is a plug-in wire so you can just pull it out. You can remove the ring and other wirings inside the light.
Step 3: Laminating the Ballast
Now, you have to clamp the loose coil lamination to the socket. Fill in the extra space by using varnish or sealer. This will make the coil stiff in one place.
You can also add a soft foam to the base of the ballast to make it tight in place. Give the ballast some time to let it dry.
Step 4: Reassembling the Ballast
Follow the first 2 steps in reverse. Put the three clips back in place and place the lampshade. Turn on the light to test the sound. This is a temporary solution for your HPS sound.
Reason 3 of 4: Tight Space

Source: https://indoorgardenook.com/
Another reason that your HPS might seem loud is your apartment size. The HPS makes a loud sound in a room or small enclosed space.
This is because an HPS is usually used outdoors or in a greenhouse for plants.
But when it is used in an enclosed space, the sound is heard loud. This also makes the sound echo on the walls of the room.
This excels in the audibility of the sound. As a result, it may cause discomfort for living.
For this complication, there may be two fixes.
Firstly, you can install a box to cover the ballast to make it soundproof. Secondly, you may install sound dampers on the walls.
For more details let’s get into the process:
Fix: Cover the Ballast with a Box
The noise associated with the ballast is often due to the cooling accompanying the intense heat.
For this, plant growers use vent hoods to deal with the heat.
In this case, you can either DIY your vent hood or directly purchase one. For the latter one, we got some good quality recommendations that you can depend on.


Now for the DIY part, a 4” duct can be added on each side with a glass plate under the light. This plate helps light to pass directly to the plants.
The duct will help to confine the heat to the ventilation system.
You can also make an air cooler duct which is usually a 6” tube. This will help in ballast noise reduction by controlling heat.
Moreover, you must make sure that the extraction fan setup is powerful enough to keep up with the duct. The inside room temperature should also be cool enough.
This is as pushing hot air will not do enough good in cooling a hot light. This will also increase the risk of fusing the bulb faster than usual.
Fix: Install Sound Dampers on the Wall
Is your HPS sound disturbing your neighbors?
One last way to stop that from happening is soundproofing your room. There are many ways to do that.
One of the cheapest ways is to install sound dampers.
Before starting the process, you need to understand the layout of your room. As HPS noise is of high frequency, it can spread through air, windows, doors, and walls.
We have picked up the easiest way you can install sound dampers in.
Before we start, let’s see what all is needed.
Things You Will Need:
| Buy | Image | Product | How's it good? |
|---|---|---|---|
| Order Now! |  | SILIGUN Caulking Gun | Anti Drip Extreme-Duty Caulking Gun |
| Order Now! |  | 3M 8511 Paint Sanding Valved N95 Cool-Flow Respirator, 10-Pack | Adjustable M noseclip helps ensure a custom, secure seal |
| Order Now! |  | DEWALT 20V MAX* XR Drywall Screw Gun Kit | Nosecone of the drywall gun locks on securely |
| Order Now! |  | Amazon Basics Soft Grip Retractable Utility Knife | Soft-grip ergonomic handle |
| Order Now! |  | BPMI FP586 5/8-Inch thick 6-7/8-Inch Diameter Fireguard Drywall Plug | Ideal for holes similar to the size of a soccer ball |
| Order Now! |  | SilverStone Technology EPDM Sound Dampening Foam | Excellent adhesion in high temperature |
| Order Now! |  | Design Engineering 050220 Boom Mat Spray | Universal Fit |
| Order Now! |  | Xcluder Garage Door Rodent Shield | Weather and corrosion resistant |
| Order Now! |  | M-D Building Products 68247 1-1/4-Inch EPDM 36-Inch DB006 Commercial Grade Door Sweep | Fits doors up to 36-Inch wide |
| Order Now! |  | AES Fiber Glass | Non-toxic, non-carcinogenic, |
| Order Now! |  | GE Sealants & Adhesives | Quick curing and easy to apply |
| Order Now! |  | M-D Building Wood Transition Strip | Screws Fit Firmly In Pre-Drilled Holes For Easy Installation |
Step 1: Turning off Electric Box
Turn off power from the main electric panel. Move the electric box that shares the same stud cavity and separate them.
After that use acoustical sealant or silicone caulk to seal the electrical box. Make sure to seal the opening of the box and any holes through the studs and plates.
Step 2: Filling Insulator
Fill the stud cavity with fiberglass batts keeping no open gap or cavity. Split the insulator and fit it around pipes and cables.
You can use a utility knife to separate the pieces of the insulator.
Step 3: Cutting the Channels
Make a resilient channel to stud with a 24 inches gap. You can use drywall of 1-¼ inch and the top of the channel should be under the top plate.
The channels should not run more than 1 inc past studs. For cutting the channels use an aviation snip. Mark the stud location on the walls.
Step 4: Sealing the Door
Screw drywall to the channel’s flange. The sheets should run in a vertical direction. Use 1-¼ inch thread drywall screws that are 12 inches apart.
Also, seal the doors with adhesive-backed gaskets. You may also install a jamb extension to make the wall jamb-free.
Or seal the gap under the door with a wood transition strip. Also, screw a door sweep on the backside of the door. As a result, the strip won’t be stripped. It is better to use an automatic door sweep for easy use.
Reason 4 of 4: Faulty Fixture
Many times, you will see that the HPS is making occasional high pitch noise.
This happens when your HPS bulb is old. On average, the lifespan of HPS is 24,000 hours. This is approx. 2000 days. So using this light for plants won’t be a good growth solution.
In this case, you can go for halide or fluorescent fixtures.
Once we compared between kessil and radion and saw these lights are very good for aqua plants and fish. Likewise, fluorescent light of the high-temperature color of 4100 to 6500K is enough for your ingrown plants.
Moreover, a 26 to 55-watt compact fluorescent light can easily outperform a 70-watt HPS. You should be having a lot of questions by now. Don’t worry, it will all be cleared out in the next part.
Fix: Halide/ Fluorescent Fixture
You can convert your HPS with a standard metal halide or fluorescent light. Because fluorescent lights are more sustainable.
The process for converting both is the same. One difference is that halide lamps have transformers, unlike fluorescent fixtures.
The step-by-step process is given below.
Things You Will Need:
| Buy | Image | Title |
|---|---|---|
| Choose Now! |  | Stud Finder Sensor Wall Scanner |
| Choose Now! |  | BLACK+DECKER 20V MAX Matrix Cordless Drill |
| Choose Now1 |  | SKIL Rechargeable 4V Cordless Screwdriver |
| Choose Now! |  | Sunlite 03681-SU MH1000/U/BT56 M47/S Metal Halide Lamp |
Step 1: Locating the Stud
Firstly, shut off all the power at the circuit breaker. You can locate a ceiling stud using a stud finder to mount the light fixture.
If you can’t find the stud, you can mount the fixture using toggle bolts. These lights are quite heavy so they need to be mounted strongly.
Wall anchors must be avoided as they have horizontal application. So, there is a chance of a pull-out.
Step 2: Unplugging Wire
If the fixture has a diffuser, remove it. Follow the wiring instructions. You need to match the wire colors to your electrical source i.e., white to white.
If it is a plug-in model, you can plug it directly into the outlet without an extension cord.
Step 3: Setting up Fixture
If the fixture is a hanging one, don’t mount it into the ceiling.
Use a small link chain and suspend the fixture from any eyelets. Drill your holes into the ceiling and stud or for toggle bolts, use through the ceiling.
Close any access covers and screw the fixture to the ceiling.
Still, Buzzing? Why Not Switch to Digital Ballasts?
Source: https://www.galvinpower.org/
Have you already tried all the solutions? Is your HPS still buzzing?
If yes, then there is no other alternative to getting a new one. However, a new magnetic HPS can also have a buzzing problem.
So, what type of ballasts will produce minimum noise?
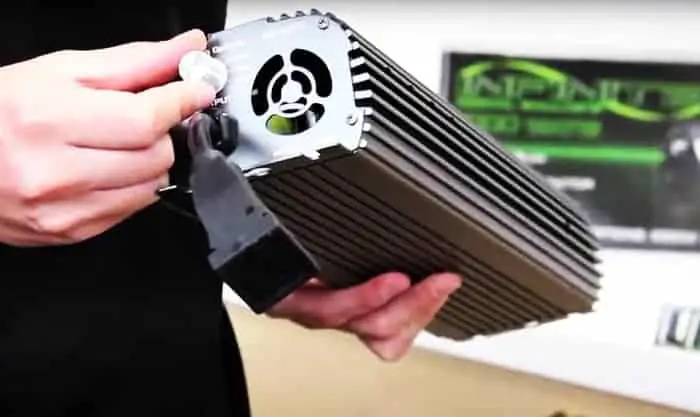
Digital Ballast
If you want to grow plants in a small closed area, digital ballast is the best for you.
It has absolutely no sound and saves energy. Your monthly bill will reduce by up to 4-5 %.
Oh and here are our top choices for digital ballasts-
| Price | Image | Title |
|---|---|---|
| Get Started |  | iPower GLBLST1000DX4 4-Pack |
| Get Started |  | iPower GLSETX400DHMWING20 |
Electronic Ballast
Electronic ballasts function at a frequency of 20,000 hertz. On the other hand, magnetic ballasts work at a frequency of 60 hertz.
Nonetheless, here’s our top preference for electronic ballast.
| Price | Image | Title |
|---|---|---|
| Get One Today |  | ROBERTSON 3P20116 eBallast |
| Get One Today |  | Philips Advance ICN-2P32 |
Now, coming back to the main concern, do electronic ballasts make noise?
Yes, you can hear them in a quiet room and the sound increases with time. However, the noise can be ignored by background sound in a typical crowded space.
FAQs
Is HPS a good grow light?
Yes, HPS is the best growing light for its high potential light output. A wide variety of plants can be grown using this light. For example, a 1000w HPS bulb gives 130,000 lumens of light at 1150 PPFD. This is far less lumen compared to other forms of light which is best for plants.
How far should my HPS be from plants?
The brighter the light, the further you’ll need to hang it. So, a 1000w light should be hung at least 15″ (38cm) away. You won’t want to go higher than 30 inches (76cm) above your plants, depending on the power of your light.
Is it possible to reduce HPS noise?
Yes, it is possible to reduce HPS noise. This can be done by using an insulation box, fixing any loose wire or capacitor, etc. Installing dampers on your walls will help in not spreading out the noise. Moreover, a better alternative to the buzz of magnetic HPS is shifting to an electric HPS.
Bottom Line
So, this is all from us on how to make HPS not as loud. Finally, as you have come this far, we have an extra tip for you. A typical ballast usually lasts for 20 years. So you need to change it after the lifespan to avoid any accidents.
Do you have any quarries? Let us know in the comment section below. Till then, have a good day!